• Skip to main content

Asphalt Milling Pro

Expert Guides for Operators, by Operators

  • Home
  • Blog

asphaltmillpro

Nov 26 2025

Digging Dirt With a Milling Machine: Complete Operator Guide

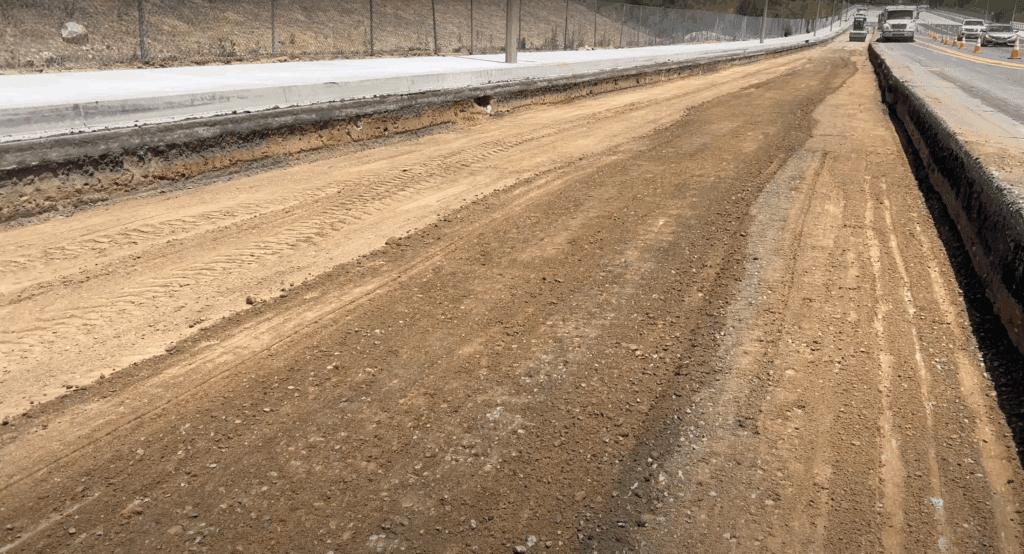
Clean dirt excavation cut made with a Wirtgen milling machine showing depth and grade after full-depth removal.

Digging dirt with a milling machine isn’t something most contractors think about — but it should be. Under the right conditions, a cold planer can move material faster, cleaner, and more accurately than traditional earthmoving equipment like excavators, loaders, and scrapers.

If you know how to do it right, a Wirtgen can become a serious time-saver on underground utilities, parking lot reconstruction, trenching, and full-depth removals.

Below is a full operator guide based on real-world experience digging dirt with Wirtgen 207Fi, 200i, and 210Fi machines — including how deep you can go, how to avoid plugging, and how to stay safe while maintaining accurate grade.


Why Digging Dirt With a Milling Machine Works

Insanely Fast Load-Out

A milling machine can load 18–20 tons of material into a truck in one to three minutes.

No excavator, scraper, or loader even comes close.

More Accurate Cuts

A Wirtgen can:

  • Hit precise grade or slope
  • Remove material exactly where planned
  • Leave only minor grader touch-up work
  • Produce a cleaner cut than traditional dirt equipment

With the right settings and technique, you can grade faster and cleaner than a blade operator.


How Deep Can You Dig?

Using a Wirtgen 207Fi, 200i, and 210Fi, I’ve successfully milled dirt down to 20 inches and deeper.

Depth depends on:

  • Soil type
  • Moisture
  • Drum speed
  • Operator technique
  • Side plate support
  • Whether you have base rock mixed in

The Key to Digging Dirt: Drum Speed + Slow Travel

Dirt doesn’t load the engine the way asphalt does. It feels soft, so it’s easy to go too fast — and overload the hydraulic system instead.

Rule #1: Spin the drum as fast as possible.

High RPM clears the drum and keeps material from packing inside the housing.

Rule #2: Go slow. Really slow.

Let the drum do the work.

Signs you’re going too fast:

  • Conveyor begins to bog
  • Rolling surges in drum/engine tone
  • Housing starts packing
  • Dirt stops clearing from the drum

If it surges repeatedly, stop and allow the drum to unload. Rocks or debris will usually sling out once the drum catches up.


🔧 

Pro Tip for Wirtgen Fi Machines: Run in Full Manual Mode for Maximum RPM

A very specific — and very important — trick for the Fi-series (210Fi, 207Fi, 130Fi, 120Fi, etc.):

✔ ALWAYS run the machine in 

full manual mode, not Eco or Power.

Eco and Power modes both reduce available drum RPM, which is exactly what you don’t want in dirt.

Manual mode gives you:

  • Maximum possible drum speed
  • Stable RPM under load
  • Better clearing of sticky dirt
  • Less plugging in the housing
  • Better conveyor performance
  • Faster production overall

Dirt rarely loads the engine, so the only thing stopping you is hydraulic overload — and you avoid that by keeping the drum at full speed.

If your drum is surging or not throwing dirt, immediately check:

  1. Travel speed
  2. Whether you accidentally slipped into Power or Eco mode

Make verifying Manual Mode part of your pre-pass routine.


Water Management: When to Use It, When to Run Dry

Water can either help you or hurt you depending on soil type.

Using Water

If water works with the soil type:

  1. Get the drum sloppy wet before entering dirt
  2. Keep water low enough to avoid nozzle clogging
  3. Travel SLOW so water hits the drum—not the ground

If you see water pouring out behind the machine, you’re going too fast.

Running Dry

Sometimes water is the enemy and causes plugging.

When running dry:

  • Expect to clean nozzles at shift end
  • Rely on drum speed to keep the housing clear
  • Watch for sudden clogging or surges
  • Don’t overload the volume inside the cutter housing

Dish Soap Trick for Sticky Clay

For clay that packs inside the drum:

  • Add a heavy dose of Dawn dish soap to the tank
  • DO NOT use laundry soap
  • The soap makes the drum slippery
  • Helps prevent plugging and buildup

This works especially well on black clay but is always trial-and-error depending on the soil.


Keeping the Moldboard Clear (Critical for Grade Control)

Your moldboard will pack with dirt — and when it does, it stops moving.

To prevent that:

  • Raise/lower before every pass
  • “Shake” the dirt off
  • Don’t let material hard-pack
  • Keep cylinders exercised
  • Maintain a smooth flow under the moldboard

If it packs solid, you’ll lose precise grade control instantly.


Using MDI to Hold Accurate Depth

MDI is your best friend in dirt.

If you’re digging 10” but your MDI shows the door at 12”, you’re cutting 2” too deep.

Use MDI to:

  • Match door depth to side plate depth
  • Verify true cutting depth
  • Compensate for soft soil or side plate sinking
  • Cut more accurately in any dirt type

This is essential because engine load cannot be trusted in dirt.


Cutting on Slope Instead of Grade

When running slope:

  • Look at the actual side plate reading
  • Compare it to what the slope setting is trying to cut
  • Match moldboard and MDI accordingly

Even in slope mode you can still see real cutting depth on the center panel.


Compaction Matters

Soft dirt causes the side plate to sink, giving a false reading.

Fix:

  • Have a roller compact the surface
  • Don’t let the machine ride the thin edge of your last pass
  • Always back up far away from the edge
  • Keep haul trucks away from the edge too

⚠️ 

Safety: Prevent Edge Collapse and Rollovers

Two major rules:

1. Never back up on the edge of your previous cut.

If it collapses, the machine can drop before Level Pro reacts.

2. Keep trucks off the edge.

Their weight can cave in the sidewall.

Once the cut area is wide enough, ramp the ends so trucks can sit in the hole next to you.


Understanding Different Dirt Types

Best Case: Dry, Slightly Sandy Soil

Flows well

Minimal plugging

Fastest production

Worst Case: Sticky Black Clay

If you can make a tight hand-packed ball, the mill will struggle.

Tips:

  • Leave some base rock from asphalt removal
  • Mix in 2–3 inches of aggregate
  • Let the blade windrow material up
  • Straddle the windrow and load it with the mill(WAY faster than loading with a loader)

Final Thoughts

Digging dirt with a milling machine isn’t just possible — it can outperform traditional excavation when done correctly.

Once you understand:

✔ Drum speed

✔ Manual mode on Fi machines

✔ Slow travel

✔ Water management

✔ Moldboard clearing

✔ MDI depth control

✔ Edge protection

…a Wirtgen can out-produce traditional equipment by a huge margin.

See Dirt Digging in Action: Watch These Videos

Digging dirt with a cold planer is something most operators haven’t seen done — and even fewer know how to do correctly. These two videos show real-world examples of how fast and clean a Wirtgen can excavate when set up properly.


Video 1: Digging Dirt With a Wirtgen 210Fi (Real-Time Production)

In this video, I use a Wirtgen 210Fi to dig dirt fast and clean, showing the exact drum speed, travel technique, and material flow you read about in this article. Watch how quickly the machine loads the trucks and how the drum handles the dirt once it’s running at full manual RPM.

▶ Watch here:


Video 2: Full Video of Dirt Digging Production – Slow Travel, High Drum RPM

This video dives deeper into the technique: slow travel, highest possible drum RPM, and how to read the machine’s behavior so you never overload the hydraulic system or pack the drum. This is a great video for new operators who want to see what correct dirt milling looks and sounds like.

▶ Watch here:

Written by asphaltmillpro · Categorized: Uncategorized · Tagged: cold planer excavation, digging dirt with a milling machine, full depth removal, Wirtgen milling machine

Nov 20 2025

How to Be a Great Ground Man on an Asphalt Milling Machine

If you want to run a milling crew that’s safe, productive, and professional, it starts with one position: the ground man. A great ground man can make or break a job. They control the flow of truck exchanges, keep the machine safe, support the operator, and ultimately determine how smooth and efficient the cut is.

Being a great ground man in asphalt milling isn’t just about showing up on the job — it’s about mastering one of the most important roles on a milling crew. Whether you call it a ground guy, ground crew hand, or milling ground man, this position is the backbone of every successful asphalt milling operation. The ground man keeps the trucks moving, supports the operator, spots hazards before they become expensive problems, and helps maintain safe, smooth, and efficient production. If you want to improve your skills and become a reliable asset on any asphalt milling crew, this guide will show you exactly what it takes.

Wirtgen cold milling machine cutting asphalt with ground man assisting
Check out my livestream where I share my thoughts on groundmen

Why the Ground Man Is So Important

On any milling crew, the operator may steer the ship — but the ground man is the one navigating the waters.

A good ground man:

  • Keeps trucks moving smoothly
  • Prevents machine accidents
  • Improves production rate
  • Keeps the operator aware of hazards
  • Maintains clean, consistent milling results
  • Protects the teeth, the cutter drum, and the machine

A bad ground man slows everything down, stresses the operator, and increases the chances of damaged teeth, torn conveyors, or even rollovers.


1. Know Your Role: What a Ground Man Actually Does

Here are the core responsibilities of an effective ground man:

Control Truck Exchanges

You’re the point of contact for every truck driver. You guide backing up, positioning, dumping, and pull-offs. If trucks don’t move smooth, the cut doesn’t move smooth.

Communicate Constantly with the Operator

You’re their eyes and ears: watching the conveyor, checking the edge of cut, spotting hazards, and monitoring anyone approaching the machine.

Maintain a Clean Work Area

Debris in front of the drum or under the cutter housing can cause crooked cuts, broken teeth, or belt damage.

Protect the Drum and Teeth

You must spot manholes, valve cans, steel, concrete patches, and other obstacles before the drum hits them.

Support the Operator

A great ground man anticipates what the operator needs next.


2. Master Communication (Hand Signals + Radios)

Communication is everything. A great ground man uses clear, direct signals.

Essential Hand Signals:

  • Slow down
  • Speed up
  • Left / Right corrections
  • Stop
  • Truck up / Truck back
  • Conveyor left / right

If you’re using radios, keep it short and calm:

“Bring him back. Stop. Hold. Truck pulling out. Next truck coming in.”

Never talk too much — talk just enough.


3. Learn the Machine: Wirtgen-Specific Knowledge

Even if you’re not operating, you need to understand how the machine works.

Know the basics of:

  • Moldboards (front and rear)
  • Drum centerline and side plates
  • Level Pro Active sensors
  • Water spray bars and water flow
  • Belt tracking and tension
  • Tramming vs milling mode

The more you understand the operator’s job, the better you support them.


4. Truck Management: Your Most Critical Job

Truck exchanges determine production. If trucks aren’t ready, the machine stops — and time is money.

How to run trucks like a pro:

  • Bring trucks in early
  • Keep trucks square to the conveyor
  • Reduce spillage by keeping trucks tight to the machine
  • Signal the operator when the truck is full
  • Always have the next truck staged

If the drum stops cutting because of slow truck swaps, you’re losing thousands per day.


5. Watch the Material Flow

Always keep an eye on:

  • Conveyor speed
  • Belt tracking
  • Material spillage
  • Excessive dust
  • Material backing up in the cutter housing

If anything looks off, tell the operator immediately. A jammed conveyor or off-track belt can destroy a shift.


6. Know Your Hazards: Protect the Drum

This is where a good ground man earns respect.

Watch for:

  • Manholes
  • Valve cans
  • Water valves
  • Steel plates
  • Sewer grates
  • Rebar
  • Concrete patches
  • ADA ramps
  • Transitions

Walk the cut ahead whenever possible and mark hazards clearly.

If anything looks questionable, stop the machine before the drum hits it.


7. Keep the Cut Clean

Debris anywhere near the drum is a problem.

Keep these areas clean:

  • Front of the cutter housing
  • Tracks
  • Drum access area
  • Conveyor area
  • Around the moldboards

A clean job prevents broken teeth, wandering cuts, and slow production. Use tools — never your hands — anywhere near the drum.


8. Stay Ahead of the Operator

A good ground man is proactive, not reactive.

Always stay:

  • 10–20 feet ahead of the machine
  • Watching the edge of cut
  • Checking grade transitions
  • Ensuring trucks are staged
  • Monitoring material flow

If the operator constantly has to tell you what to do, you’re slowing them down.


9. Safety First — Always

This job can turn deadly if you get careless.

Follow the big rules:

  • Never walk behind the machine while it’s backing up
  • Stay clear of conveyor swing radius
  • Never step between the machine and a truck
  • Maintain eye contact with truck drivers
  • Wear clean, highly visible PPE
  • Never go near the cutter drum while it’s moving

If something sounds wrong or looks wrong, stop the machine immediately.


10. Take Pride in Your Work

A great ground man:

  • Works consistently
  • Communicates well
  • Stays organized
  • Keeps the site clean
  • Helps maintain machine performance

Operators remember their best ground men — and their worst. Be the one they trust.


Final Thoughts

Being a great ground man is about awareness, communication, safety, machine knowledge, and pride in your craft. When you master these skills, you’re not just supporting the operator — you’re setting yourself up to become a lead ground man or even a milling machine operator.

FOr a guide on how to use the level pro grade system check out my blog here

Written by asphaltmillpro · Categorized: Uncategorized

Jun 01 2025

How and When to Use Slope Control on an Asphalt Milling Machine

When you’re behind the controls of a Wirtgen milling machine, precision is everything. Slope control is one of the most powerful—and misunderstood—tools in your arsenal. When used correctly, it ensures proper drainage, matches cross-slopes, and helps achieve spec with minimal rework. But knowing when and how to use slope control on a asphalt milling machine makes all the difference between a clean cut and a costly callback.

What Is Slope Control?

Slope control is a grade automation feature that adjusts one side of the milling drum relative to the other. Instead of cutting perfectly level across the width, slope control lets you tilt the drum slightly to follow an intended cross-slope—usually for water runoff or lane matching. On Wirtgen machines, this is typically adjusted via the LEVEL PRO system or 3D automation, depending on your setup.

When to Use Slope Control

Here are the most common situations where slope control is essential:

1. 

Maintaining Cross-Slope for Drainage

When milling roads with built-in cross-slope (typically 2%), you’ll want to preserve or match that slope in your cut. Use slope control to follow the existing crown and prevent flat spots that collect water.

2. 

Transitioning Into or Out of Superelevations

Highways and ramps often tilt (superelevate) for speed and drainage. Slope control lets you maintain that angle smoothly during milling. Without it, you’d risk creating a jagged or uneven profile.

3. 

Matching a Lane or Shoulder

If you’re milling one lane next to an untouched lane or shoulder, you can use slope control to mirror the grade. This avoids harsh edges or dangerous mismatches when lanes are tied back in.

4. 

Correcting a Previously Uneven Surface

Slope control can help level a wavy or improperly crowned surface by overriding inconsistent surface grade and enforcing a uniform cross-slope.


How to Set Up and Use Slope Control

Here’s a general step-by-step for Wirtgen machines, but always refer to your model’s operator manual. For more information on the Wirtgen Level Pro system check out my guide here.

1. 

Start with a job walkthrough

Get with the Forman or super on the job and walk the job so you have a full understanding of what they are trying to accomplish. You may decide that slope may not be the best option.

2. 

Set Your Reference Side

Pick one side to follow ground reference—usually the high side if you’re cutting a slope. Use a sonic sensor, ski, or string line to hold a consistent height.

3. 

Engage Slope Control on the Opposite Side

On the other side of the drum, switch from grade control to slope mode. Set your desired cross-slope (e.g., -2.0%) and allow the system to auto-adjust during the cut.

4. 

Monitor and Adjust On the Fly

Watch for signs that your slope is drifting (water pooling, uneven passes). Use manual grade adjustment sparingly if you hit unexpected surface changes like potholes, patches, or utility lids.


Pro Tips for Better Slope Control Results

  • Calibrate regularly: Grade sensors can drift. Recalibrate at the start of each job. If your grade control is off your slope will be also.
  • Check your sensors: Dirty or damaged sensors can cause overcorrections. Check them before each shift.
  • Communicate with your crew: Let your ground man or foreman know what slope settings you’re running so they can verify with string lines or grade checks.
  • Use a dual-grade setup when possible: If the entire lane needs accurate slope and elevation, reference both sides—one on grade, one on slope.

Final Thoughts

Slope control is one of the most valuable tools for producing spec-grade cuts efficiently and safely. Whether you’re milling a city street or a highway ramp, understanding when to use slope—and how to set it up—can save you hours of rework, keep your joints clean, and make your paving crew’s life a whole lot easier.

Written by asphaltmillpro · Categorized: Uncategorized

Dec 31 2024

Mastering Grade Control with Level Pro Active on Wirtgen Fi Series

Are you struggling with the new grade control system on Wirtgen Fi Series milling machines? The Level Pro Active system might seem complex at first, but once you understand its features, you’ll see how it simplifies your work and enhances precision. Here’s a step-by-step guide to mastering grade control, saving you time and effort on the job.

Wirtgen Level Pro Active Control Box

Key Features of Level Pro Active

1. Intuitive Automatic Functions

The Level Pro Active system operates similarly to its predecessor, with independent automatic controls for the right and left sides just like before. By simply pressing the swap buttons, you can easily move the middle screen to the outside controls, ensuring seamless adjustments.

2. Match and Swap Sensors

One standout feature is the ability to match and swap sensors without stopping your workflow. Lower the rabbit foot, observe the grade reading, and switch sensors seamlessly. The system automatically matches the settings, eliminating the need for manual recalibration.

3. Slope Adjustments Made Simple

Switching to slope mode no longer requires manual synchronization. Use the dedicated match-and-swap button to align slope values instantly, ensuring the machine maintains consistent grades during transitions. For a guide on how to use the slope control, check out my guide here.


Advanced Functionalities You’ll Love

Set Your Zero with Ease

Calibrating the system is straightforward—just press the button to set zero, and adjust using the dial. Whether you need precise tenth-inch changes or rapid whole-inch adjustments, the system adapts to your needs.

Customizable Screens

Operators can toggle between three screen configurations, optimizing their workflow. This flexibility ensures that ground operators and machine controllers can work in harmony without disrupting each other’s settings.

Water Management Enhancements

From controlling the spray bar to adjusting water pressure based on machine load, Level Pro Active ensures you maintain optimal cooling and dust suppression. The ability to calculate water usage for the remaining job distance adds even more efficiency to the process.


Why It Matters: The Active Second Cut

One of the most innovative additions is the active second cut feature. This tool automatically matches the depth of your initial pass, ensuring consistency on flat surfaces. It’s particularly useful for deep cuts, such as 8–10 inches, and delivers near-perfect results every time.


Get Ahead in Milling Operations

Mastering Level Pro Active isn’t just about improving your efficiency—it’s about leveraging cutting-edge technology to achieve superior results with less effort. Whether you’re tackling a standard job or managing complex slopes, these features ensure that your Wirtgen Fi Series machine performs at its peak.


Join the Community

Want more tips and tricks for operating Wirtgen milling machines? Subscribe to our YouTube channel for in-depth tutorials, troubleshooting advice, and expert demonstrations. Hit the bell icon to stay notified about our latest videos. With over 27 years of experience, we’re here to help you succeed in every project. Don’t forget to comment with your questions or video requests!


Stay safe and efficient on the job, and remember—mastery begins with understanding the tools at your disposal.

Written by asphaltmillpro · Categorized: Uncategorized

Copyright © 2026 · Asphalt Milling Pro.com